搜索到
11
篇与
的结果
-

-
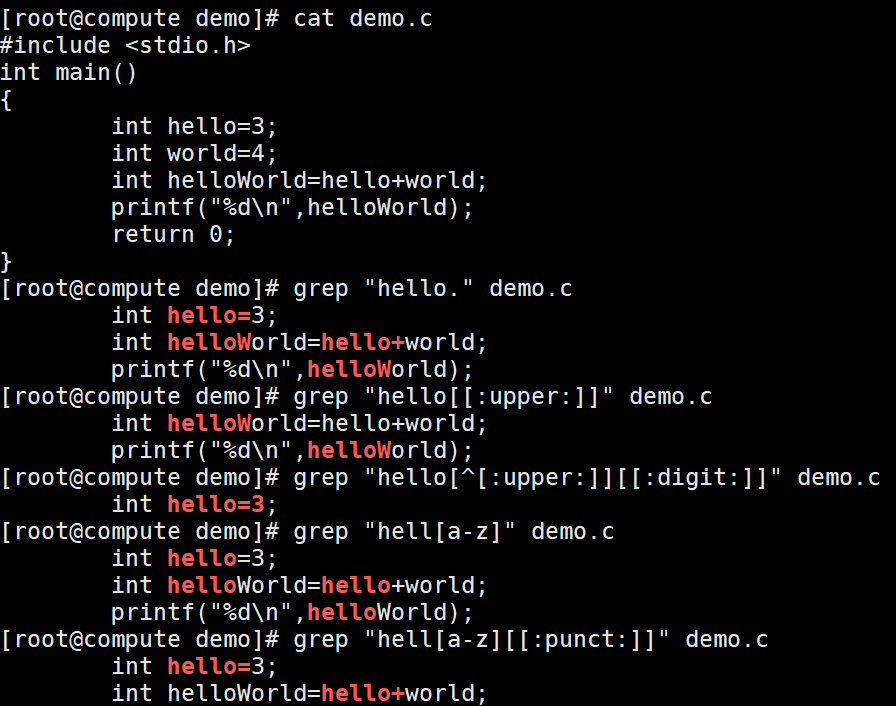
Linux grep命令 Linux grep命令简介Linux grep 命令用于查找文件里符合条件的字符串。grep 指令用于查找内容包含指定的范本样式的文件,如果发现某文件的内容符合所指定的范本样式,预设 grep 指令会把含有范本样式的那一列显示出来。若不指定任何文件名称,或是所给予的文件名为 -,则 grep 指令会从标准输入设备读取数据。grep家族总共有三个:grep,egrep,fgrep。语法grep [选项] "模式" [文件] grep [-abcEFGhHilLnqrsvVwxy][-A<显示行数>][-B<显示行数>][-C<显示行数>][-d<进行动作>][-e<范本样式>][-f<范本文件>][--help][范本样式][文件或目录...] 参数-a 或 --text : 不要忽略二进制的数据。-A<显示行数> 或 --after-context=<显示行数> : 除了显示符合范本样式的那一列之外,并显示该行之后的内容。-b 或 --byte-offset : 在显示符合样式的那一行之前,标示出该行第一个字符的编号。-B<显示行数> 或 --before-context=<显示行数> : 除了显示符合样式的那一行之外,并显示该行之前的内容。-c 或 --count : 计算符合样式的列数。-C<显示行数> 或 --context=<显示行数>或-<显示行数> : 除了显示符合样式的那一行之外,并显示该行之前后的内容。-d <动作> 或 --directories=<动作> : 当指定要查找的是目录而非文件时,必须使用这项参数,否则grep指令将回报信息并停止动作。-e<范本样式> 或 --regexp=<范本样式> : 指定字符串做为查找文件内容的样式。-E 或 --extended-regexp : 将样式为延伸的正则表达式来使用。-f<规则文件> 或 --file=<规则文件> : 指定规则文件,其内容含有一个或多个规则样式,让grep查找符合规则条件的文件内容,格式为每行一个规则样式。-F 或 --fixed-regexp : 将样式视为固定字符串的列表。-G 或 --basic-regexp : 将样式视为普通的表示法来使用。-h 或 --no-filename : 在显示符合样式的那一行之前,不标示该行所属的文件名称。-H 或 --with-filename : 在显示符合样式的那一行之前,表示该行所属的文件名称。-i 或 --ignore-case : 忽略字符大小写的差别。-l 或 --file-with-matches : 列出文件内容符合指定的样式的文件名称。-L 或 --files-without-match : 列出文件内容不符合指定的样式的文件名称。-n 或 --line-number : 在显示符合样式的那一行之前,标示出该行的列数编号。-o 或 --only-matching : 只显示匹配PATTERN 部分。-q 或 --quiet或--silent : 不显示任何信息。-r 或 --recursive : 此参数的效果和指定"-d recurse"参数相同。-s 或 --no-messages : 不显示错误信息。-v 或 --invert-match : 显示不包含匹配文本的所有行。-V 或 --version : 显示版本信息。-w 或 --word-regexp : 只显示全字符合的列。比如找like,就不会匹配文本中的liker-x --line-regexp : 只显示全列符合的列。-y : 此参数的效果和指定"-i"参数相同。模式部分直接输入要匹配的字符串,这个可以用fgrep(fast grep)代替来提高查找速度,比如我要匹配一下hello.c文件中printf的个数:fgrep -c "printf" hello.c使用基本正则表达式,下面谈关于基本正则表达式的使用:匹配字符: . :任意一个字符。[abc] :表示匹配一个字符,这个字符必须是abc中的一个。[a-zA-Z] :表示匹配一个字符,这个字符必须是a-z或A-Z这52个字母中的一个。1 :匹配一个字符,这个字符是除了1、2、3以外的所有字符。对于一些常用的字符集,系统做了定义:[A-Za-z] 等价于 [[:alpha:]][0-9] 等价于 [[:digit:]][A-Za-z0-9] 等价于 [[:alnum:]]tab,space 等空白字符 [[:space:]][A-Z] 等价于 [[:upper:]][a-z] 等价于 [[:lower:]]标点符号 [[:punct:]]匹配次数:{m,n} :匹配其前面出现的字符至少m次,至多n次。? :匹配其前面出现的内容0次或1次,等价于{0,1}。:匹配其前面出现的内容任意次,等价于{0,},所以 ".*" 表述任意字符任意次,即无论什么内容全部匹配。位置锚定:^ :锚定行首$ :锚定行尾。技巧" ^$ "用于匹配空白行。\b或\<:锚定单词的词首。如"\blike"不会匹配alike,但是会匹配liker\b或\>:锚定单词的词尾。如"\blike\b"不会匹配alike和liker,只会匹配like\B :与\b作用相反。分组及引用:(string) :将string作为一个整体方便后面引用\1 :引用第1个左括号及其对应的右括号所匹配的内容。\2 :引用第2个左括号及其对应的右括号所匹配的内容。\n :引用第n个左括号及其对应的右括号所匹配的内容。扩展的(Extend)正则表达式注意:使用扩展的正则表达式要加-E选项,或者世界使用egrep匹配字符: 与基本正则表达式一样匹配次数::和基本正则表达式一样? :基本正则表达式是?,这里没有\。{m,n} :相比基本正则表达式也是没有了\。:匹配其前面的字符至少一次,相当于{1,}。位置锚定:和基本正则表达式一样。分组及引用:(string) :相比基本正则表达式也是没有了\。\1 :引用部分和基本正则表达式一样。\n :引用部分和基本正则表达式一样。或者:a|b :匹配a或b,注意a是指 | 的左边的整体,b也同理。比如 C|cat 表示的是 C或cat,而不是Cat或cat,如果要表示Cat或cat,则应该写为 (C|c)at 。记住(string)除了用于引用还用于分组。注1:默认情况下,正则表达式的匹配工作在贪婪模式下,也就是说它会尽可能长地去匹配,比如某一行有字符串 abacb,如果搜索内容为 "a.*b" 那么会直接匹配 abacb这个串,而不会只匹配ab或acb。注2:所有的正则字符,如 [ 、* 、( 等,若要搜索 ,而不是想把 解释为重复先前字符任意次,可以使用 * 来转义。参考:Linux grep命令-菜鸟教程linux中grep命令的用法123 ↩
-
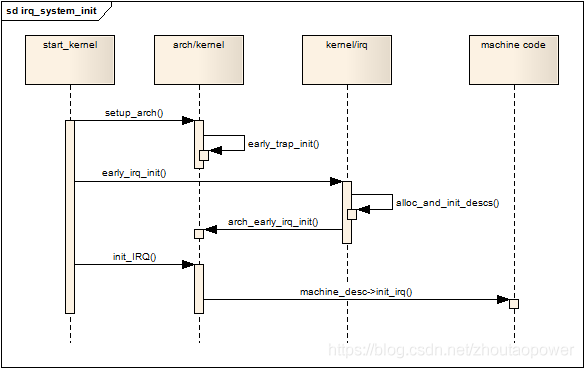
Linux内核中断机制 [TOC]1. 中断的概念中断是指在CPU正常运行期间,由于内外部事件或由程序预先安排的事件引起的 CPU 暂时停止正在运行的程序,转而为该内部或外部事件或预先安排的事件服务的程序中去,服务完毕后再返回去继续运行被暂时中断的程序。Linux中通常分为外部中断(又叫硬件中断)和内部中断(又叫异常)。当 CPU 收到一个中断 (IRQ)的时候,会去执行该中断对应的处理函数(ISR)。普通情况下,会有一个中断向量表,向量表中定义了 CPU 对应的每一个外设资源的中断处理程序的入口,当发生对应的中断的时候, CPU 直接跳转到这个入口执行程序。也就是中断上下文。(注意:中断上下文中,不可阻塞睡眠)。2. Linux中断 top/bottom玩过 MCU 的人都知道,中断服务程序的设计最好是快速完成任务并退出,因为此刻系统处于被中断中。但是在 ISR 中又有一些必须完成的事情,比如:清中断标志,读/写数据,寄存器操作等。在 Linux 中,同样也是这个要求,希望尽快的完成 ISR。但事与愿违,有些 ISR 中任务繁重,会消耗很多时间,导致响应速度变差。Linux 中针对这种情况,将中断分为了两部分:上半部(top half):收到一个中断,立即执行,有严格的时间限制,只做一些必要的工作,比如:应答,复位等。这些工作都是在所有中断被禁止的情况下完成的。底半部(bottom half):能够被推迟到后面完成的任务会在底半部进行。在适合的时机,下半部会被开中断执行。3. 中断处理程序驱动程序可以使用接口:request_irq(unsigned int irq, irq_handler_t handler, unsigned long flags, const char *name, void *dev)参数含义irq表了该中断的中断号,一般 CPU 的中断号都会事先定义好。handler中断发生后的 ISRflags中断标志( IRQF_DISABLED / IRQFSAMPLE_RANDOM / IRQF_TIMER / IRQF_SHARED)name中断相关的设备 ASCII 文本,例如 "keyboard",这些名字会在 /proc/irq 和 /proc/interrupts 文件使用dev用于共享中断线,传递驱动程序的设备结构。非共享类型的中断,直接设置成为 NULL中断标志flag的含义:标志含义IRQF_DISABLED设置这个标志的话,意味着内核在处理这个 ISR 期间,要禁止其他中断(多数情况不使用这个)IRQFSAMPLE_RANDOM表明这个设备产生的中断对内核熵池有贡献IRQF_TIMER为系统定时器准备的标志IRQF_SHARED表明多个中断处理程序之间共享中断线。同一个给定的线上注册每个处理程序,必须设置这个调用request_irq成功执行返回0。常见错误是 -EBUSY,表示给定的中断线已经在使用(或者没有指定 IRQF_SHARED)注意:request_irq 函数可能引起睡眠,所以不允许在中断上下文或者不允许睡眠的代码中调用。Linux内核熵池:Linux内核采用熵来描述数据的随机性。熵(entropy)是描述系统混乱无序程度的物理量,一个系统的熵越大则说明该系统的有序性越差,即不确定性越大。在信息学中,熵被用来表征一个符号或系统的不确定性,熵越大,表明系统所含有用信息量越少,不确定度越大。计算机本身是可预测的系统,因此,用计算机算法不可能产生真正的随机数。但是机器的环境中充满了各种各样的噪声,如硬件设备发生中断的时间,用户点击鼠标的时间间隔等是完全随机的,事先无法预测。Linux内核实现的随机数产生器正是利用系统中的这些随机噪声来产生高质量随机数序列。核维护了一个熵池用来收集来自设备驱动程序和其它来源的环境噪音。理论上,熵池中的数据是完全随机的,可以实现产生真随机数序列。为跟踪熵池中数据的随机性,内核在将数据加入池的时候将估算数据的随机性,这个过程称作熵估算。熵估算值描述池中包含的随机数位数,其值越大表示池中数据的随机性越好。释放中断:const void *free_irq(unsigned int irq, void *dev_id)用于释放中断处理函数。注意:Linux 中的中断处理程序是无须重入的。当给定的中断处理程序正在执行的时候,其中断线在所有的处理器上都会被屏蔽掉,以防在同一个中断线上又接收到另一个新的中断。通常情况下,除了该中断的其他中断都是打开的,也就是说其他的中断线上的重点都能够被处理,但是当前的中断线总是被禁止的,故,同一个中断处理程序是绝对不会被自己嵌套的。4. 中断上下文与进程上下文不一样,内核执行中断服务程序的时候,处于中断上下文。中断处理程序并没有自己的独立的栈,而是使用了内核栈,其大小一般是有限制的(32bit 机器 8KB)。所以其必须短小精悍。同时中断服务程序是打断了正常的程序流程,这一点上也必须保证快速的执行。同时中断上下文中是不允许睡眠,阻塞的。中断上下文不能睡眠的原因是:1、 中断处理的时候,不应该发生进程切换,因为在中断context中,唯一能打断当前中断handler的只有更高优先级的中断,它不会被进程打断,如果在 中断context中休眠,则没有办法唤醒它,因为所有的wake_up_xxx都是针对某个进程而言的,而在中断context中,没有进程的概念,没 有一个task_struct(这点对于softirq和tasklet一样),因此真的休眠了,比如调用了会导致block的例程,内核几乎肯定会死。2、schedule()在切换进程时,保存当前的进程上下文(CPU寄存器的值、进程的状态以及堆栈中的内容),以便以后恢复此进程运行。中断发生后,内核会先保存当前被中断的进程上下文(在调用中断处理程序后恢复);但在中断处理程序里,CPU寄存器的值肯定已经变化了吧(最重要的程序计数器PC、堆栈SP等),如果此时因为睡眠或阻塞操作调用了schedule(),则保存的进程上下文就不是当前的进程context了.所以不可以在中断处理程序中调用schedule()。3、内核中schedule()函数本身在进来的时候判断是否处于中断上下文:if(unlikely(in_interrupt()))BUG();因此,强行调用schedule()的结果就是内核BUG。4、中断handler会使用被中断的进程内核堆栈,但不会对它有任何影响,因为handler使用完后会完全清除它使用的那部分堆栈,恢复被中断前的原貌。5、处于中断context时候,内核是不可抢占的。因此,如果休眠,则内核一定挂起。5. 举例比如 RTC 驱动程序 (drivers/char/rtc.c)。在 RTC 驱动的初始化阶段,会调用到 rtc_init 函数:module_init(rtc_init);在这个初始化函数中调用到了 request_irq 用于申请中断资源,并注册服务程序:static int __init rtc_init(void) { ... rtc_int_handler_ptr = rtc_interrupt; ... request_irq(RTC_IRQ, rtc_int_handler_ptr, 0, "rtc", NULL) ... }RTC_IRQ 是中断号,和处理器绑定。rtc_interrupt 是中断处理程序:static irqreturn_t rtc_interrupt(int irq, void *dev_id) { /* * Can be an alarm interrupt, update complete interrupt, * or a periodic interrupt. We store the status in the * low byte and the number of interrupts received since * the last read in the remainder of rtc_irq_data. */ spin_lock(&rtc_lock); rtc_irq_data += 0x100; rtc_irq_data &= ~0xff; if (is_hpet_enabled()) { /* * In this case it is HPET RTC interrupt handler * calling us, with the interrupt information * passed as arg1, instead of irq. */ rtc_irq_data |= (unsigned long)irq & 0xF0; } else { rtc_irq_data |= (CMOS_READ(RTC_INTR_FLAGS) & 0xF0); } if (rtc_status & RTC_TIMER_ON) mod_timer(&rtc_irq_timer, jiffies + HZ/rtc_freq + 2*HZ/100); spin_unlock(&rtc_lock); wake_up_interruptible(&rtc_wait); kill_fasync(&rtc_async_queue, SIGIO, POLL_IN); return IRQ_HANDLED; }每次收到 RTC 中断,就会调用进这个函数。6. 中断处理流程发生中断时,CPU执行异常向量vector_irq的代码, 即异常向量表中的中断异常的代码,它是一个跳转指令,跳去执行真正的中断处理程序,在vector_irq里面,最终会调用中断处理的总入口函数。C 语言的入口为 : asm_do_IRQ(unsigned int irq, struct pt_regs *regs)asmlinkage void __exception_irq_entry asm_do_IRQ(unsigned int irq, struct pt_regs *regs) { handle_IRQ(irq, regs); }该函数的入参 irq 为中断号。asm_do_IRQ -> handle_IRQvoid handle_IRQ(unsigned int irq, struct pt_regs *regs) { __handle_domain_irq(NULL, irq, false, regs); }handle_IRQ ->\_\_handle_domain_irqint __handle_domain_irq(struct irq_domain *domain, unsigned int hwirq, bool lookup, struct pt_regs *regs) { struct pt_regs *old_regs = set_irq_regs(regs); unsigned int irq = hwirq; int ret = 0; irq_enter(); #ifdef CONFIG_IRQ_DOMAIN if (lookup) irq = irq_find_mapping(domain, hwirq); #endif /* * Some hardware gives randomly wrong interrupts. Rather * than crashing, do something sensible. */ if (unlikely(!irq || irq >= nr_irqs)) { ack_bad_irq(irq); ret = -EINVAL; } else { generic_handle_irq(irq); } irq_exit(); set_irq_regs(old_regs); return ret; }这里请注意:先调用了 irq_enter 标记进入了硬件中断:irq\_enter是更新一些系统的统计信息,同时在\_\_irq_enter宏中禁止了进程的抢占。虽然在产生IRQ时,ARM会自动把CPSR中的I位置位,禁止新的IRQ请求,直到中断控制转到相应的流控层后才通过local_irq_enable()打开。那为何还要禁止抢占?这是因为要考虑中断嵌套的问题,一旦流控层或驱动程序主动通过local_irq_enable打开了IRQ,而此时该中断还没处理完成,新的irq请求到达,这时代码会再次进入irq\_enter,在本次嵌套中断返回时,内核不希望进行抢占调度,而是要等到最外层的中断处理完成后才做出调度动作,所以才有了禁止抢占这一处理再调用 generic\_handle\_irq最后调用 irq_exit 删除进入硬件中断的标记\_\_handle_domain_irq -> generic_handle_irqint generic_handle_irq(unsigned int irq) { struct irq_desc *desc = irq_to_desc(irq); if (!desc) return -EINVAL; generic_handle_irq_desc(desc); return 0; } EXPORT_SYMBOL_GPL(generic_handle_irq);首先在函数 irq_to_desc 中根据发生中断的中断号,去取出它的 irq_desc 中断描述结构,然后调用 generic_handle_irq_desc:static inline void generic_handle_irq_desc(struct irq_desc *desc) { desc->handle_irq(desc); }这里调用了 handle_irq 函数。所以,在上述流程中,还需要分析 irq_to_desc 流程:struct irq_desc *irq_to_desc(unsigned int irq) { return (irq < NR_IRQS) ? irq_desc + irq : NULL; } EXPORT_SYMBOL(irq_to_desc);NR_IRQS 是支持的总的中断个数,当然,irq 不能够大于这个数目。所以返回 irq_desc + irq。irq_desc 是一个全局的数组:struct irq_desc irq_desc[NR_IRQS] __cacheline_aligned_in_smp = { [0 ... NR_IRQS-1] = { .handle_irq = handle_bad_irq, .depth = 1, .lock = __RAW_SPIN_LOCK_UNLOCKED(irq_desc->lock), } };这里是这个数组的初始化的地方。所有的 handle_irq 函数都被初始化成为了 handle_bad_irq。细心的观众可能发现了,调用这个 desc->handle_irq(desc) 函数,并不是咱们注册进去的中断处理函数啊,因为两个函数的原型定义都不一样。这个 handle_irq 是 irq_flow_handler_t 类型,而我们注册进去的服务程序是 irq_handler_t,这两个明显不是同一个东西,所以这里我们还需要继续分析。6.1 中断相关的数据结构Linux中,与中断相关的数据结构有3个结构名称作用irq_descIRQ 的软件层面上的资源描述,用于描述IRQ线的属性与状态,被称为中断描述符。irqactionIRQ 的通用操作irq_chip对应每个芯片的具体实现,用于描述不同类型的中断控制器。irq_chip 是一串和芯片相关的函数指针,这里定义的非常的全面,基本上和 IRQ 相关的可能出现的操作都全部定义进去了,具体根据不同的芯片,需要在不同的芯片的地方去初始化这个结构,然后这个结构会嵌入到通用的 IRQ 处理软件中去使用,使得软件处理逻辑和芯片逻辑完全的分开。6.2 初始化Chip相关的IRQ众所周知,启动的时候,C 语言从 start_kernel 开始,在这里面,调用了和 machine 相关的 IRQ 的初始化 init_IRQ():asmlinkage __visible void __init start_kernel(void) { char *command_line; char *after_dashes; ..... early_irq_init(); init_IRQ(); ..... }在 init_IRQ 中,调用了 machine_desc->init_irq():void __init init_IRQ(void) { int ret; if (IS_ENABLED(CONFIG_OF) && !machine_desc->init_irq) irqchip_init(); else machine_desc->init_irq(); if (IS_ENABLED(CONFIG_OF) && IS_ENABLED(CONFIG_CACHE_L2X0) && (machine_desc->l2c_aux_mask || machine_desc->l2c_aux_val)) { if (!outer_cache.write_sec) outer_cache.write_sec = machine_desc->l2c_write_sec; ret = l2x0_of_init(machine_desc->l2c_aux_val, machine_desc->l2c_aux_mask); if (ret && ret != -ENODEV) pr_err("L2C: failed to init: %d\n", ret); } uniphier_cache_init(); }machine_desc->init_irq() 完成对中断控制器的初始化,为每个irq_desc结构安装合适的流控handler,为每个irq_desc结构安装irq_chip指针,使他指向正确的中断控制器所对应的irq_chip结构的实例,同时,如果该平台中的中断线有多路复用(多个中断公用一个irq中断线)的情况,还应该初始化irq_desc中相应的字段和标志,以便实现中断控制器的级联。这里初始化的时候回调用到具体的芯片相关的中断初始化的地方。int __init s5p_init_irq_eint(void) { int irq; for (irq = IRQ_EINT(0); irq <= IRQ_EINT(15); irq++) irq_set_chip(irq, &s5p_irq_vic_eint); for (irq = IRQ_EINT(16); irq <= IRQ_EINT(31); irq++) { irq_set_chip_and_handler(irq, &s5p_irq_eint, handle_level_irq); set_irq_flags(irq, IRQF_VALID); } irq_set_chained_handler(IRQ_EINT16_31, s5p_irq_demux_eint16_31); return 0; }而在这些里面,都回去调用类似于:void irq_set_chip_and_handler_name(unsigned int irq, struct irq_chip *chip, irq_flow_handler_t handle, const char *name); irq_set_handler(unsigned int irq, irq_flow_handler_t handle) { __irq_set_handler(irq, handle, 0, NULL); } static inline void irq_set_chained_handler(unsigned int irq, irq_flow_handler_t handle) { __irq_set_handler(irq, handle, 1, NULL); } void irq_set_chained_handler_and_data(unsigned int irq, irq_flow_handler_t handle, void *data); 这些函数定义在 include/linux/irq.h 文件。是对芯片初始化的时候可见的 APIs,用于指定中断“流控”中的 :irq_flow_handler_t handle也就是中断来的时候,最后那个函数调用。中断流控函数,分几种,电平触发的中断,边沿触发的等:/* * Built-in IRQ handlers for various IRQ types, * callable via desc->handle_irq() */ extern void handle_level_irq(struct irq_desc *desc); extern void handle_fasteoi_irq(struct irq_desc *desc); extern void handle_edge_irq(struct irq_desc *desc); extern void handle_edge_eoi_irq(struct irq_desc *desc); extern void handle_simple_irq(struct irq_desc *desc); extern void handle_untracked_irq(struct irq_desc *desc); extern void handle_percpu_irq(struct irq_desc *desc); extern void handle_percpu_devid_irq(struct irq_desc *desc); extern void handle_bad_irq(struct irq_desc *desc); extern void handle_nested_irq(unsigned int irq);而在这些处理函数里,会去调用到 : handle_irq_event 比如:/** * handle_level_irq - Level type irq handler * @desc: the interrupt description structure for this irq * * Level type interrupts are active as long as the hardware line has * the active level. This may require to mask the interrupt and unmask * it after the associated handler has acknowledged the device, so the * interrupt line is back to inactive. */ void handle_level_irq(struct irq_desc *desc) { raw_spin_lock(&desc->lock); mask_ack_irq(desc); if (!irq_may_run(desc)) goto out_unlock; desc->istate &= ~(IRQS_REPLAY | IRQS_WAITING); /* * If its disabled or no action available * keep it masked and get out of here */ if (unlikely(!desc->action || irqd_irq_disabled(&desc->irq_data))) { desc->istate |= IRQS_PENDING; goto out_unlock; } kstat_incr_irqs_this_cpu(desc); handle_irq_event(desc); cond_unmask_irq(desc); out_unlock: raw_spin_unlock(&desc->lock); }而这个 handle_irq_event 则是调用了处理,handle_irq_event_percpu:irqreturn_t handle_irq_event(struct irq_desc *desc) { irqreturn_t ret; desc->istate &= ~IRQS_PENDING; irqd_set(&desc->irq_data, IRQD_IRQ_INPROGRESS); raw_spin_unlock(&desc->lock); ret = handle_irq_event_percpu(desc); raw_spin_lock(&desc->lock); irqd_clear(&desc->irq_data, IRQD_IRQ_INPROGRESS); return ret; }handle_irq_event_percpu->\_\_handle_irq_event_percpu-> [action->handler()]这里终于看到了调用 的地方了,就是咱们通过 request_irq 注册进去的函数7. /proc/interrupts这个 proc 下放置了对应中断号的中断次数和对应的 dev-name参考:Linux 中断之中断处理浅析
-
线程与对称处理器 1. 进程和线程进程的概念有两个特点,一是资源所有权。一个进程包括一个存放进程映像的虚拟地址空间;二是调度/执行。一个进程沿着通过一个或多个程序的一条执行路径(轨迹)执行。这两个特点是独立的,为了区分这两个特点,分派的单位通常称作线程,而拥有资源所有权的单位称为进程。1.1 多线程在多线程环境中,进程被定义成资源分配的单位和一个被保护的单位,与进程相关联的有:存放进程映像的虚拟地址空间受保护地对处理器、其他进程(用于进程间通信)、文件和I/O资源的访问。在一个进程中,可能有一个或多个线程,每个线程有:线程执行状态(运行、就绪等)在未运行时保存的线程上下文;从某种意义上看,线程可以被看做进程内的一个被独立地操作的程序计数器一个执行栈用于每个线程局部变量的静态存储空间与进程内的其他线程共享的对进程的内存和资源的访问。线程的优点:在一个已有进程中创建一个新线程比创建一个全新进程所需的时间要少许多。研究表明,在UNIX中,线程的创建比进程快10倍终止一个线程比终止一个进程花费的时间少同一个进程内线程间切换比进程间切换花费的时间少线程提高了不同的执行程序间通信的效率。在大多数操作系统中,独立进程间的通信需要内核的介入,以提供保护和通信所需要的机制。但是,由于同一个进程中的线程共享内存和文件,它们无需调用内核就可以互相通信。
-
并发性:互斥与同步 操作系统设计中的核心问题是关于进程和线程的管理。并发是所有问题的基础,也是操作系统设计的基础。并发包括许多设计问题,其中有进程间通信、资源共享与竞争(例如内存、文件、I/O访问)、多个进程活动的同步以及分配给进程的处理器时间等。和并发相关的一些关键术语:原子操作一个或多个指令的序列,对外是不可分的;即没有其他进程可以看到其中间状态或者中断此操作临界区是一段代码,在这段代码中进程将访问共享资源,当另外一个进程已经在这段代码中运行时,这个进程就不能在这段代码中执行。死锁两个或两个以上的进程因其中的每个进程都在等待其他进程做完某些事情而不能继续执行,这样的情形叫做死锁活锁两个或两个以上进程为了响应其他进程中的变化而持续改变自己的状态但不做有用的工作,这样的情形叫做活锁互斥当一个进程在临界区访问共享资源时,其他进程不能进入该临界区访问任何共享资源,这种情形叫做互斥竞争条件多个线程或者进程在读写一个共享数据时,结果依赖于它们执行的相对时间,这种情形叫做竞争饥饿是指一个可运行的进程尽管可能继续执行,但被调度器无限期地忽视,而不能被调度执行的情况1.并发的原理在单处理器系统的情况下,出现问题的原因是中断可能会在进程中任何地方停止指令的执行;在多处理器系统的情况下,不仅同样的条件可以引发问题,而且当两个进程同时执行并且都试图访问同一个全局变量时,也会引发问题。这两类问题的解决方案是相同的:控制对共享资源的访问1.1 竞争条件竞争条件发生在多个进程或线程读写数据时,其最终的结果依赖于多个进程的指令执行顺序。1.2 操作系统关注的问题并发会带来哪些设计和管理问题?操作系统必须能够记住各个活跃的进程操作系统必须为每个进程分配和释放各种资源。操作系统必须保护每个进程的数据和物理资源,避免其他进程的无意干涉一个进程的功能和输出结果必须与执行速度无关。1.3 进程的交互知道程度关系一个进程对其他进程的影响潜在的控制问题进程之间不知道对方的存在竞争1.一个进程的结果与其他进程的活动无关 2.进程的执行时间可能会受影响互斥、死锁(可复用的资源)、饥饿进程间接知道对方的存在(如共享对象)通过共享合作1.一个进程的结果可能依赖于从其他进程获得的信息 2.进程的执行时间可能会受到影响互斥、死锁(可复用的资源)、饥饿、数据一致性进程直接知道对方的存在(它们有可用的通信原语)通过通信合作1.一个进程的结果可能依赖于从其他进程获得的信息2.进程的计时可能会受到影响死锁(可消费的资源)、饥饿2. 信号量现在讨论操作系统和用于提供并发性的程序设计语言机制。基本原理:两个或多个进程可以通过简单的信号进行合作,一个进程可以被迫在某一位置停止,直到它接收到一个特定的信号。任何复杂的合作需求都可以通过适当的信号结构得到满足,为了发信号,需要使用一个被称作信号量的特殊变量。为通过信号量s发送信号,进程可执行原语semSignal(s)(V操作);为通过信号量s接收信号,进程可执行原语semWait(s)(P操作);如果相应的信号仍然没有发送,则进程被挂起,直到发送完为止。为了达到预期的效果,可以把信号量看做是一个具有整数值的变量,在它之上定义三个操作:1)一个信号量可以初始化成非负数2)semWait操作使信号量减1。如果值变成负数,则执行semWait的进程被阻塞。否则进程继续执行。3)semSignal操作使信号量加1。如果值小于或者等于零,则被semWait操作阻塞的进程被解除阻塞。除了这三种操作外,没有任何其他方法可以检查或操作信号量。解释:开始时,信号量的值为零或正数。如果该值为正数,则该值等于发出semWait操作后可立即继续执行的进程的数量。如果该值为零(或者由于初始化,或者由于有等于信号量初值的进程已经等待),则发出semWait操作的下一个进程会被阻塞,此时该信号量的值变为负值。之后,每个后续的semWait操作都会使信号量的负值更大。该负值等于正在等待接触阻塞的进程的数量。在信号量为负值的情形下,每一个semSignal操作都会将等待进程中的一个进程解除阻塞。在信号量为负值的情形下,每一个semSignal操作都会将等待进程中的一个进程解除阻塞。2.1 互斥使用信号量s解决互斥问题的方法。设有n个进程,用数组P(i)表示,所有的进程都需要访问共享资源。每个进程中进入临界区前执行semWait(s),如果s的值为负,则进程被挂起;如果值为1,则s被减为0,进程立即进入临界区;由于s值不再为正,因而其他任何进程都不能进入临界区。/* program mutualexeclusion */ const int n = /* 进程数 */; semaphore s = 1; void P(int i) { while(true){ semWait(s); /* 临界区 */ semSignal(s); /* 其他部分 */ } } void main() { parbegin(P(1), P(2), ..., P(n)); }
-
(1)进程内存管理初探 [TOC]随着cpu技术发展,现在大部分移动设备、PC、服务器都已经使用上64bit的CPU,但是关于Linux内核的虚拟内存管理,还停留在历史的用户态与内核态虚拟内存3:1的观念中,导致在解决一些内存问题时存在误解。例如现在主流的移动设备操作系统Android,经常遇到进程使用大量内存导致被lmk杀死,分配不到内存而触发OOM/ANR,或者分配内存慢导致卡顿,内核态使用哪个分配内存的函数更合理等问题,有些涉及物理内存分配,有些涉及虚拟内存分配,如果不熟悉虚拟内存管理的技术知识,可能走很多弯路。本章节结合代码介绍进程虚拟内存布局以及进程的虚拟内存分配释放流程,涉及的代码是android-8.1, 内核版本kernel-4.9,架构是arm64。1. 几种地址的概念1.1 物理地址每片物理内存存储实际地址,例如一个8GB的内存,0x00000000表示第一个byte的地址,而0xFFFFFFFF表示的是最后一个byte的地址;物理地址的值与实际的内存条上的地址一一对应,物理地址的大小与cpu访问物理内存的总线宽度有一定的关系。1.2 线性地址为了保证系统多任务运行的安全性和可靠性(防止一个任务篡改系统或者其他任务的内存),CPU增加段页式内存管理;段基地址+段内偏移构成的地址就是线性地址;如果开启的分页内存管理,线性地址还要通过MMU计算才能转换出物理地址。1.3 逻辑地址每个进程运行时CPU看到的地址就是逻辑地址,实际上也是线性地址中的段内偏移地址,逻辑地址与段基地址可以计算出线性地址。进程在访问虚拟地址空间的任意合法地址时,都要按照逻辑地址->线性地址->物理地址的顺序换算才能找到对应的物理地址;由于段式内存管理存在性能、访问效率的问题,以及Linux要兼容各种CPU,在Linux内核中所有的用户态进程使用的同一个段,且段基地址都是0,如此既可以兼容的传统的段式内存管理,又可以通过页式内存映射更灵活的管理内存。由于同一个段基地址都是0,对每个进程来说,逻辑地址和线性地址是一样的;同时每个进程的PGD是不一样的,从而保证每个进程之间隔离,不同进程同一个虚拟地址映射的物理地址就不一样了。Linux系统采用延迟分配物理内存的策略,用户态进程每次分配内存时分配的都是虚拟内存,表示一段地址空间已经分配出来供进程使用;当进程第一次访问虚拟地址时,才会发现虚拟地址没有对应的物理内存,系统默认会触发缺页异常,从内核物理内存管理系统中分配物理页,建立页表中把虚拟地址映射到物理地址。对于缺页异常处理流程,页表创建/建立/销毁等操作在以后文章中介绍。2. 进程虚拟内存空间分布理论上,64bit地址支持访问的地址空间是[0, 2(64-1)],而实际上现有的应用程序都不会用这么大的地址空间,并且arm64芯片现在也不支持访问这么大的地址空间,arm64架构芯片最大支持访问48bit的地址空间。例如在Android系统中,整个虚拟地址空间分成两部分,如下图所示:其中[0x0001000000000000,0xFFFF000000000000]之间的地址是不规范地址,不能使用;该段内存把整个虚拟地址空间划分为两段,低段内存为进程用户态地址空间,高段内存为内核地址空间。参考代码arch\arm64\include\asm\memory.h):#define VA_BITS (CONFIG_ARM64_VA_BITS) #define VA_START (UL(0xffffffffffffffff)) << VA_BITS) #define PAGE_OFFSET (UL(0xffffffffffffffff)) << (VA_BITS - 1 )) 如果内核打开CONFIG_COMPAT选项,说明用户态既支持64位进程,也支持32位进程;由于32bit的地址最多可以访问的虚拟地址空间最多只有4GB,所以32位进程的用户态进程地址空间与64位进程是有区别的。32位进程的用户态地址空间是[0x0, 0x00000000FFFF_FFFF]64位进程的用户态地址空间是[0x0, 0x0000FFFFFFFF_FFFF]从代码看出,32bit进程用户空间大小是4GB,64bit进程的虚拟内存大小与CONFIG_ARM64_VA_BITS的值相关;如果CONFIG_ARM64_VA_BITS是48bit则可以达到256TB,现在的移动设备显然用不到这么大的内存空间,所以大部分Android设备中CONFIG_ARM64_VA_BITS默认配置的是39,即64bit进程的最大虚拟地址空间大小是512GB。虽然32bit或者64bit的进程在用户态内存空间大小不一样,但是当它们陷入到内核态后,访问的内核空间地址是没有差异的,都是从VA_START开始,直到0xFFFFFFFFFFFFFFFF结束,也是512GB。每个进程的虚拟地址空间主要分为如下几个区域(如图):参考:https://cloud.tencent.com/developer/article/1647582http://www.360doc.com/content/13/0915/09/8363527_314549128.shtml
-
gcc和objdump 1. gcc-ansi 关闭 gnu c中与ansi c不兼容的特性,激活ansi c的专有特性 ( 包括禁止一些 asm inline typeof 关键字 , 以及 UNIX,vax 等预处理宏-lxx 表示动态加载libxx.so库-Lxx 表示增加目录xx,让编译器可以在xx下寻找库文件-Ixx 表示增加目录xx,让编译器可以在xx下寻找头文件优化选项-shared 生成共享目标文件。通常用在建立共享库时-Wall 生成所有警告信息。一下是具体的选项,可以单独使用简单的GCC语法:如果你只有一个文件(或者只有几个文件),那么就可以不写Makefile文件(当然有Makefile更加方便),用gcc直接编译就行了。在这里我们只介绍几个我经常用的几个参数,第一是 “-o”,它后面的参数表示要输出的目标文件,再一个是 “-c”,表示仅编译(Compile),不链接(Make),如果没有”-c”参数,那么就表示链接,如下面的几个命令:gcc –c test.c,表示只编译test.c文件,成功时输出目标文件test.ogcc –c test.c –o test.o ,与上一条命令完全相同gcc –o test test.o,将test.o连接成可执行的二进制文件testgcc –o test test.c,将test.c编译并连接成可执行的二进制文件testgcc test.c –o test,与上一条命令相同gcc –c test1.c,只编译test1.c,成功时输出目标文件test1.ogcc –c test2.c,只编译test2.c,成功时输出目标文件test2.ogcc –o test test1.o test2.o,将test1.o和test2.o连接为可执行的二进制文件testgcc –c test test1.c test2.c,将test1.o和test2.o编译并连接为可执行的二进制文件test注:如果你想编译cpp文件,那么请用g++,否则会有类似如下莫名其妙的错误:cc3r3i2U.o(.eh_frame+0x12): undefined reference to `__gxx_personality_v0’......还有一个参数是”-l”参数,与之紧紧相连的是表示连接时所要的链接库,比如多线程,如果你使用了pthread_create函数,那么你就应该在编译语句的最后加上”-lpthread”,”-l”表示连接,”pthread”表示要连接的库,注意他们在这里要连在一起写,还有比如你使用了光标库curses,那么呢就应该在后面加上”-lcurses”,比如下面的写法:gcc –o test test1.o test2.o –lpthread –lcurses例如: 在ubuntu 环境下编译基于course库函数的程序时,如果不带 -lncurses时,会出现screen1.c:(.text+0x12):对‘initscr’未定义的引用screen1.c:(.text+0x24):对‘wmove’未定义的引用screen1.c:(.text+0x39):对‘printw’未定义的引用screen1.c:(.text+0x4a):对‘wrefresh’未定义的引用screen1.c:(.text+0x5f):对‘endwin’未定义的引用需使用 gcc -o screen1 screen1.c -lncurses2. objdumpgcc命令之 objdump ---------------objdump是用查看目标文件或者可执行的目标文件的构成的GCC工具----------以下3条命令足够那些喜欢探索目标文件与源代码之间的丝丝的关系的朋友。objdump -x obj 以某种分类信息的形式把目标文件的数据组织(被分为几大块)输出 <可查到该文件的所有动态库> objdump -t obj 输出目标文件的符号表()objdump -h obj 输出目标文件的所有段概括()objdump -j .text/.data -S obj 输出指定段的信息,大概就是反汇编源代码把objdump -S obj C语言与汇编语言同时显示 以下为网上摘录文章。关于nm -s的显示请自己man nm查看objdump命令的man手册objdump - 显示二进制文件信息objdump [-a] [-b bfdname | --target=bfdname] [-C] [--debugging] [-d] [-D] [--disassemble-zeroes] [-EB|-EL|--endian={big|little}] [-f] [-h] [-i|--info] [-j section | --section=section] [-l] [-m machine ] [--prefix-addresses] [-r] [-R] [-s|--full-contents] [-S|--source] [--[no-]show-raw-insn] [--stabs] [-t] [-T] [-x] [--start-address=address] [--stop-address=address] [--adjust-vma=offset] [--version] [--help] objfile... --archive-headers-a 显示档案库的成员信息,与 ar tv 类似objdump -a libpcap.a 和 ar -tv libpcap.a 显示结果比较比较 显然这个选项没有什么意思。--adjust-vma=offsetWhen dumping information, first add offset to all the section addresses. This is useful if the sec- tion addresses do not correspond to the symbol table, which can happen when putting sections at particular addresses when using a format which can not represent section addresses, such as a.out.-b bfdname--target=bfdname指定目标码格式。这不是必须的,objdump能自动识别许多格式, 比如:objdump -b oasys -m vax -h fu.o 显示fu.o的头部摘要信息,明确指出该文件是Vax系统下用Oasys 编译器生成的目标文件。objdump -i将给出这里可以指定的 目标码格式列表--demangle-C 将底层的符号名解码成用户级名字,除了去掉所有开头 的下划线之外,还使得C++函数名以可理解的方式显示出来。--debugging显示调试信息。企图解析保存在文件中的调试信息并以C语言 的语法显示出来。仅仅支持某些类型的调试信息。--disassemble-d 反汇编那些应该还有指令机器码的section--disassemble-all-D 与 -d 类似,但反汇编所有section--prefix-addresses反汇编的时候,显示每一行的完整地址。这是一种比较老的反汇编格式。 显示效果并不理想,但可能会用到其中的某些显示,自己可以对比。--disassemble-zeroes一般反汇编输出将省略大块的零,该选项使得这些零块也被反汇编。-EB-EL--endian={big|little}这个选项将影响反汇编出来的指令。 little-endian就是我们当年在dos下玩汇编的时候常说的高位在高地址, x86都是这种。 --file-headers-f 显示objfile中每个文件的整体头部摘要信息。--section-headers--headers-h 显示目标文件各个section的头部摘要信息。--help 简短的帮助信息。--info-i 显示对于 -b 或者 -m 选项可用的架构和目标格式列表。--section=name-j name 仅仅显示指定section的信息--line-numbers-l 用文件名和行号标注相应的目标代码,仅仅和-d、-D或者-r一起使用 使用-ld和使用-d的区别不是很大,在源码级调试的时候有用,要求 编译时使用了-g之类的调试编译选项。--architecture=machine-m machine指定反汇编目标文件时使用的架构,当待反汇编文件本身没有描述 架构信息的时候(比如S-records),这个选项很有用。可以用-i选项 列出这里能够指定的架构 --reloc-r 显示文件的重定位入口。如果和-d或者-D一起使用,重定位部分以反汇 编后的格式显示出来。--dynamic-reloc-R 显示文件的动态重定位入口,仅仅对于动态目标文件有意义,比如某些 共享库。--full-contents-s 显示指定section的完整内容。objdump --section=.text -s inet.o | more --source-S 尽可能反汇编出源代码,尤其当编译的时候指定了-g这种调试参数时, 效果比较明显。隐含了-d参数。--show-raw-insn反汇编的时候,显示每条汇编指令对应的机器码,除非指定了 --prefix-addresses,这将是缺省选项。 --no-show-raw-insn反汇编时,不显示汇编指令的机器码,这是指定 --prefix-addresses 选项时的缺省设置。 --stabsDisplay the contents of the .stab, .stab.index, and .stab.excl sections from an ELF file. This is only useful on systems (such as Solaris 2.0) in which .stab debugging symbol-table entries are carried in an ELF section. In most other file formats, debug- ging symbol-table entries are interleaved with linkage symbols, and are visible in the --syms output. --start-address=address从指定地址开始显示数据,该选项影响-d、-r和-s选项的输出。 --stop-address=address显示数据直到指定地址为止,该选项影响-d、-r和-s选项的输出。 --syms-t 显示文件的符号表入口。类似于nm -s提供的信息--dynamic-syms-T 显示文件的动态符号表入口,仅仅对动态目标文件有意义,比如某些 共享库。它显示的信息类似于 nm -D|--dynamic 显示的信息。--version 版本信息objdump --version --all-headers-x 显示所有可用的头信息,包括符号表、重定位入口。-x 等价于 -a -f -h -r -t 同时指定。objdump -x inet.o 参看 nm(1)★ objdump应用举例(待增加)/*g++ -g -Wstrict-prototypes -Wall -Wunused -o objtest objtest.c*/includeincludeint main ( int argc, char * argv[] ){execl( "/bin/sh", "/bin/sh", "-i", 0 ); return 0;}g++ -g -Wstrict-prototypes -Wall -Wunused -o objtest objtest.cobjdump -j .text -Sl objtest | more/main(查找)08048750:main():/home/scz/src/objtest.c:7*/includeincludeint main ( int argc, char * argv[] ){8048750: 55 pushl %ebp8048751: 89 e5 movl %esp,%ebp/home/scz/src/objtest.c:8 execl( "/bin/sh", "/bin/sh", "-i", 0 );8048753: 6a 00 pushl $0x08048755: 68 d0 87 04 08 pushl $0x80487d0804875a: 68 d3 87 04 08 pushl $0x80487d3804875f: 68 d3 87 04 08 pushl $0x80487d38048764: e8 db fe ff ff call 8048644 <_init+0x40>8048769: 83 c4 10 addl $0x10,%esp/home/scz/src/objtest.c:9 return 0;804876c: 31 c0 xorl %eax,%eax804876e: eb 04 jmp 8048774 8048770: 31 c0 xorl %eax,%eax8048772: eb 00 jmp 8048774 /home/scz/src/objtest.c:10}8048774: c9 leave 8048775: c3 ret 8048776: 90 nop如果说上面还不够清楚,可以用下面的命令辅助一下:objdump -j .text -Sl objtest --prefix-addresses | moreobjdump -j .text -Dl objtest | more用以上不同的命令去试会得到惊喜!
-
内核配置 1.内核源码编译过程1.遍历每个源码目录的(或配置指定的源码目录)Makefile2.每个目录的Makefile会根据Kconfig文件定制要编译的对象3.最后回到顶层目录的Makefile执行编译据此,我们可以得出各个文件的作用Kconfig--->(每个源码目录下)提供选项.config--->(源码顶层目录下)保存选择结果Makefile--->(每个源码目录下)根据.config中的内容来告知编译系统如何编译2. Kconfig基本语法2.1 单一选项总体原则:每一个config就是一个选项,最上面跟着控制句柄,下面则是对这个选项的配置,如选项名是什么,依赖什么,选中这个后同时会选择什么。config CPU_S5PC100 bool "选项名" select S5P_EXT_INT select SAMSUNG_DMADEV help Enable S5PC100 CPU supportconfig —> 选项CPU_S5PC100 —>句柄,可用于控制Makefile 选择编译方式bool —>选择可能:TRUE选中、FALSE不选 选中则编译,不选中则不编译。如果后面没有字符串名称,则表示其不会出现在选择软件列表中select —> 当前选项选中后则select后指定的选项自动被选择depends on ARM || BLACKFIN || MIPS || COLDFIREdepend on 依赖,后面的四个选择其中至少一个被选择,这个选项才能被选config DM9000 tristate "DM9000 support"tristate —> 选中并编译进内核、不选编译成模块2.2 选项为数字config ARM_DMA_IOMMU_ALIGNMENT int "Maximum PAGE_SIZE order of alignment for DMA IOMMU buffers" ---->该选项是一个整型值 range 4 9 ---->该选项的范围值 default 8 ---->该选项的默认值 help DMA mapping framework by default aligns all buffers to the smallest ...这里的defult其实也可以用在bool中config STACKTRACE_SUPPORT bool --->该选项可以选中或不选,且不会出现在选择列表中 default y ---->表示缺省情况是选中2.3 if..endifif ARCH_S5PC100 --->如果ARCH_S5PC100选项选中了,则在endif范围内的选项才会被选 config CPU_S5PC100 bool "选项名" select S5P_EXT_INT select SAMSUNG_DMADEV help Enable S5PC100 CPU support endif举个例子,如果CPU没有选择使用多核CPU,则不会出现CPU个数的选项。2.4 choice多个选项choice --->表示选择列表 prompt "Default I/O scheduler" //主目录名字 default DEFAULT_CFQ //默认CFQ help Select the I/O scheduler which will be used by default for all block devices. config DEFAULT_DEADLINE bool "Deadline" if IOSCHED_DEADLINE=y config DEFAULT_CFQ bool "CFQ" if IOSCHED_CFQ=y config DEFAULT_NOOP bool "No-op" endchoice2.5 menu与menuconfigmenu "Boot options" ----> menu表示该选项是不可选的菜单,其后是在选择列表的菜单名 config USE_OF bool "Flattened Device Tree support" select IRQ_DOMAIN select OF select OF_EARLY_FLATTREE help Include support for flattened device tree machine descriptions. .... endmenu ----> menu菜单结束menu指的是不可编辑的menu,而menuconfig则是带选项的menumenu和choice的区别menu 可以多选 choice 是单项选择题menuconfig的用法menuconfig MODULES ---> menuconfig表示MODULE是一个可选菜单,其选中后是CONFIG_MODULES bool "菜单名" if MODULES ... endif # MODULES说到底,menconfig 就是一个带选项的菜单,在下面需要用bool判断一下,选择成立后,进入if …endif 中间得空间。3.基本使用方法将写好的驱动添加到内核编译选项中1.配置Kconfig在driver目录下新建一个目录test,进入test目录,创建Kconfig文件config TEST bool "Test driver" help this for test!这里定义了一个TEST的句柄,Kconfig可以通过这个句柄来控制Makefile中是否编译,”Test driver”是显示在终端的名称。2.配置Makefile在test目录,新建一个Makefileobj-$(CONFIG_TEST) += test.o意义:obj-$(CONFIG_选项名) += xxx.o /* 当CONFIG_选项名=y时,表示对应目录下的xxx.c将被编译进内核 当CONFIG_选项名=m时对应目录下的xxx.c将被编译成模块*/3.配置上层目录的Makefile与Kconfig在上一层目录的Kconfig中,menu "Device Drivers" source "drivers/test/Kconfig"表示将test文件夹中的Kconfig加入搜寻目录在上一层目录的Makefile中,更改如下obj-y += irqchip/ obj-y += bus/ obj-y += test/ #新添加最后,运行make menuconfig,可进行配置,保存后生成.config文件。
-
IDR机制分析 1.IDR简述idr在linux内核中指的就是整数ID管理机制,从本质上来说,这就是一种将整数ID号和特定指针关联在一起的机制。这个机制最早是在2003年2月加入内核的,当时是作为POSIX定时器的一个补丁。现在,在内核的很多地方都可以找到idr的身影。idr机制适用在那些需要把某个整数和特定指针关联在一起的地方。举个例子,在I2C总线中,每个设备都有自己的地址,要想在总线上找到特定的设备,就必须要先发送该设备的地址。如果我们的PC是一个I2C总线上的主节点,那么要访问总线上的其他设备,首先要知道他们的ID号,同时要在pc的驱动程序中建立一个用于描述该设备的结构体。此时,问题来了,我们怎么才能将这个设备的ID号和他的设备结构体联系起来呢?最简单的方法当然是通过数组进行索引,但如果ID号的范围很大(比如32位的ID号),则用数组索引显然不可能;第二种方法是用链表,但如果网络中实际存在的设备较多,则链表的查询效率会很低。遇到这种清况,我们就可以采用idr机制,该机制内部采用radix树实现,可以很方便地将整数和指针关联起来,并且具有很高的搜索效率。2.idr源码分析idr的源码位于linux/idr.h文件,本文使用linux5.5.4内核代码2.1 idr结构体代码定义与初始化struct idr { struct radix_tree_root idr_rt; unsigned int idr_base; unsigned int idr_next; };其中,radix_tree_root定义为define radix_tree_root xarrayidr的初始化// 静态初始化 #define IDR_INIT(name) IDR_INIT_BASE(name, 0) // 动态初始化 static inline void idr_init(struct idr *idr);2.2 为idr分配内存void idr_preload(gfp_t gfp_mask);2.3 分配id号和指针关联int idr_alloc(struct idr , void ptr, int start, int end, gfp_t);2.4 通过id号搜索对应的指针void idr_find(const struct idr , unsigned long id);2.5 删除idvoid idr_remove(struct idr , unsigned long id);3.IDR使用
-
Linux内核中链表list文件结构分析 1. 函数原型内核中的链表结构如下,只有前后两个指针,没有数据项,可以很方便的构成双向链表struct list_head { struct list_head *next, *prev; };1.1. static inline void INIT_LIST_HEAD(struct list_head *list)运行的时候初始化链表,两个指针都指向结点自己的地址static inline void INIT_LIST_HEAD(struct list_head *list) { WRITE_ONCE(list->next, list); list->prev = list; }1.2. static inline void list_add(struct list_head new, struct list_head head);从指定结点后面插入一个结点,new为要插入的新节点的地址,head为要插入的结点,新结点从head结点后面插入/** * list_add - add a new entry * @new: new entry to be added * @head: list head to add it after * * Insert a new entry after the specified head. * This is good for implementing stacks. */ static inline void list_add(struct list_head *new, struct list_head *head) { __list_add(new, head, head->next); }其中,__list_add()函数定义如下,在知道前后结点的情况下,插入结点/* * Insert a new entry between two known consecutive entries. * * This is only for internal list manipulation where we know * the prev/next entries already! */ static inline void __list_add(struct list_head *new, struct list_head *prev, struct list_head *next) { if (!__list_add_valid(new, prev, next)) return; next->prev = new; new->next = next; new->prev = prev; WRITE_ONCE(prev->next, new); }1.3. static inline void list_add_tail(struct list_head new, struct list_head head)从链表尾部插入结点/** * list_add_tail - add a new entry * @new: new entry to be added * @head: list head to add it before * * Insert a new entry before the specified head. * This is useful for implementing queues. */ static inline void list_add_tail(struct list_head *new, struct list_head *head) { __list_add(new, head->prev, head); }1.4. static inline void list_del(struct list_head *entry)两个宏定义,删除下来的prev、next指针指向这两个特殊值,这样设置是为了保证不在链表中的结点项不可访问--对LIST_POISON1和LIST_POISON2的访问都将引起页故障。 /* * These are non-NULL pointers that will result in page faults * under normal circumstances, used to verify that nobody uses * non-initialized list entries. */ #define LIST_POISON1 ((void *) 0x100 + POISON_POINTER_DELTA) #define LIST_POISON2 ((void *) 0x122 + POISON_POINTER_DELTA)static inline void list_del(struct list_head *entry) { __list_del_entry(entry); entry->next = LIST_POISON1; entry->prev = LIST_POISON2; }其中__list_del_entry()函数定义如下:/* * Delete a list entry by making the prev/next entries * point to each other. * * This is only for internal list manipulation where we know * the prev/next entries already! */ static inline void __list_del(struct list_head * prev, struct list_head * next) { next->prev = prev; WRITE_ONCE(prev->next, next); } /* * Delete a list entry and clear the 'prev' pointer. * * This is a special-purpose list clearing method used in the networking code * for lists allocated as per-cpu, where we don't want to incur the extra * WRITE_ONCE() overhead of a regular list_del_init(). The code that uses this * needs to check the node 'prev' pointer instead of calling list_empty(). */ static inline void __list_del_clearprev(struct list_head *entry) { __list_del(entry->prev, entry->next); entry->prev = NULL; } /** * list_del - deletes entry from list. * @entry: the element to delete from the list. * Note: list_empty() on entry does not return true after this, the entry is * in an undefined state. */ static inline void __list_del_entry(struct list_head *entry) { if (!__list_del_entry_valid(entry)) return; __list_del(entry->prev, entry->next); }1.5. static inline void list_replace(struct list_head old,struct list_head new)替换链表中的结点,/** * list_replace - replace old entry by new one * @old : the element to be replaced * @new : the new element to insert * * If @old was empty, it will be overwritten. */ static inline void list_replace(struct list_head *old, struct list_head *new) { new->next = old->next; new->next->prev = new; new->prev = old->prev; new->prev->next = new; }1.6. static inline void list_replace_init(struct list_head old,struct list_head new)替换,将被替换的结点初始化为一个新链表static inline void list_replace_init(struct list_head *old, struct list_head *new) { list_replace(old, new); INIT_LIST_HEAD(old); }1.7. static inline void list_swap(struct list_head entry1,struct list_head entry2)交换两个结点/** * list_swap - replace entry1 with entry2 and re-add entry1 at entry2's position * @entry1: the location to place entry2 * @entry2: the location to place entry1 */ static inline void list_swap(struct list_head *entry1, struct list_head *entry2) { struct list_head *pos = entry2->prev; list_del(entry2); list_replace(entry1, entry2); if (pos == entry1) pos = entry2; list_add(entry1, pos); } 1.8. static inline void list_del_init(struct list_head *entry)删除一项并初始化/** * list_del_init - deletes entry from list and reinitialize it. * @entry: the element to delete from the list. */ static inline void list_del_init(struct list_head *entry) { __list_del_entry(entry); INIT_LIST_HEAD(entry); }1.9. static inline void list_move(struct list_head list, struct list_head head)搬移操作,将原本属于链表的一个结点移动到另一个链表的操作/** * list_move - delete from one list and add as another's head * @list: the entry to move * @head: the head that will precede our entry */ static inline void list_move(struct list_head *list, struct list_head *head) { __list_del_entry(list); list_add(list, head); }1.10. static inline void list_move_tail(struct list_head list,struct list_head head)/** * list_move_tail - delete from one list and add as another's tail * @list: the entry to move * @head: the head that will follow our entry */ static inline void list_move_tail(struct list_head *list, struct list_head *head) { __list_del_entry(list); list_add_tail(list, head); }1.11. static inline void list_bulk_move_tail(struct list_head head, struct list_head first, struct list_head *last)/** * list_bulk_move_tail - move a subsection of a list to its tail * @head: the head that will follow our entry * @first: first entry to move * @last: last entry to move, can be the same as first * * Move all entries between @first and including @last before @head. * All three entries must belong to the same linked list. */ static inline void list_bulk_move_tail(struct list_head *head, struct list_head *first, struct list_head *last) { first->prev->next = last->next; last->next->prev = first->prev; head->prev->next = first; first->prev = head->prev; last->next = head; head->prev = last; } 1.12. static inline int list_is_first(const struct list_head list,const struct list_head head)判断结点是否为首结点/** * list_is_first -- tests whether @list is the first entry in list @head * @list: the entry to test * @head: the head of the list */ static inline int list_is_first(const struct list_head *list, const struct list_head *head) { return list->prev == head; }1.13. static inline int list_is_last(const struct list_head list, const struct list_head head)判断结点是否为尾结点/** * list_is_last - tests whether @list is the last entry in list @head * @list: the entry to test * @head: the head of the list */ static inline int list_is_last(const struct list_head *list, const struct list_head *head) { return list->next == head; }1.14. static inline int list_empty(const struct list_head *head)判断是否是一个空链表/** * list_empty - tests whether a list is empty * @head: the list to test. */ static inline int list_empty(const struct list_head *head) { return READ_ONCE(head->next) == head; }1.15. static inline int list_empty_careful(const struct list_head *head)/** * list_empty_careful - tests whether a list is empty and not being modified * @head: the list to test * * Description: * tests whether a list is empty _and_ checks that no other CPU might be * in the process of modifying either member (next or prev) * * NOTE: using list_empty_careful() without synchronization * can only be safe if the only activity that can happen * to the list entry is list_del_init(). Eg. it cannot be used * if another CPU could re-list_add() it. */ static inline int list_empty_careful(const struct list_head *head) { struct list_head *next = head->next; return (next == head) && (next == head->prev); }1.16. static inline void list_rotate_left(struct list_head *head)翻转链表/** * list_rotate_left - rotate the list to the left * @head: the head of the list */ static inline void list_rotate_left(struct list_head *head) { struct list_head *first; if (!list_empty(head)) { first = head->next; list_move_tail(first, head); } } 1.17. static inline void list_rotate_to_front(struct list_head list,struct list_head head)/** * list_rotate_to_front() - Rotate list to specific item. * @list: The desired new front of the list. * @head: The head of the list. * * Rotates list so that @list becomes the new front of the list. */ static inline void list_rotate_to_front(struct list_head *list, struct list_head *head) { /* * Deletes the list head from the list denoted by @head and * places it as the tail of @list, this effectively rotates the * list so that @list is at the front. */ list_move_tail(head, list); }1.18. static inline int list_is_singular(const struct list_head *head)判断一个链表是否只有一项/** * list_is_singular - tests whether a list has just one entry. * @head: the list to test. */ static inline int list_is_singular(const struct list_head *head) { return !list_empty(head) && (head->next == head->prev); } 1.19. static inline void list_cut_position(struct list_head list,struct list_head head, struct list_head *entry)将一个链表拆分为两个/** * list_cut_position - cut a list into two * @list: a new list to add all removed entries * @head: a list with entries * @entry: an entry within head, could be the head itself * and if so we won't cut the list * * This helper moves the initial part of @head, up to and * including @entry, from @head to @list. You should * pass on @entry an element you know is on @head. @list * should be an empty list or a list you do not care about * losing its data. * */ static inline void list_cut_position(struct list_head *list, struct list_head *head, struct list_head *entry) { if (list_empty(head)) return; if (list_is_singular(head) && (head->next != entry && head != entry)) return; if (entry == head) INIT_LIST_HEAD(list); else __list_cut_position(list, head, entry); }1.20. static inline void list_cut_before(struct list_head list,struct list_head head,struct list_head *entry)/** * list_cut_before - cut a list into two, before given entry * @list: a new list to add all removed entries * @head: a list with entries * @entry: an entry within head, could be the head itself * * This helper moves the initial part of @head, up to but * excluding @entry, from @head to @list. You should pass * in @entry an element you know is on @head. @list should * be an empty list or a list you do not care about losing * its data. * If @entry == @head, all entries on @head are moved to * @list. */ static inline void list_cut_before(struct list_head *list, struct list_head *head, struct list_head *entry) { if (head->next == entry) { INIT_LIST_HEAD(list); return; } list->next = head->next; list->next->prev = list; list->prev = entry->prev; list->prev->next = list; head->next = entry; entry->prev = head; }1.21. static inline void list_splice(const struct list_head list,struct list_head head)连接两个链表/** * list_splice - join two lists, this is designed for stacks * @list: the new list to add. * @head: the place to add it in the first list. */ static inline void list_splice(const struct list_head *list, struct list_head *head) { if (!list_empty(list)) __list_splice(list, head, head->next); }1.22. static inline void list_splice_tail(struct list_head list,struct list_head head)/** * list_splice_tail - join two lists, each list being a queue * @list: the new list to add. * @head: the place to add it in the first list. */ static inline void list_splice_tail(struct list_head *list, struct list_head *head) { if (!list_empty(list)) __list_splice(list, head->prev, head); }1.23. static inline void list_splice_init(struct list_head list, struct list_head head)/** * list_splice_init - join two lists and reinitialise the emptied list. * @list: the new list to add. * @head: the place to add it in the first list. * * The list at @list is reinitialised */ static inline void list_splice_init(struct list_head *list, struct list_head *head) { if (!list_empty(list)) { __list_splice(list, head, head->next); INIT_LIST_HEAD(list); } }1.24. static inline void list_splice_tail_init(struct list_head list, struct list_head head)/** * list_splice_tail_init - join two lists and reinitialise the emptied list * @list: the new list to add. * @head: the place to add it in the first list. * * Each of the lists is a queue. * The list at @list is reinitialised */ static inline void list_splice_tail_init(struct list_head *list, struct list_head *head) { if (!list_empty(list)) { __list_splice(list, head->prev, head); INIT_LIST_HEAD(list); } }2. 使用的宏定义2.1. LIST_HEAD_INIT#define LIST_HEAD_INIT(name) { &(name), &(name) }2.2. LIST_HEAD#define LIST_HEAD(name) \ struct list_head name = LIST_HEAD_INIT(name) 2.3. list_entry#define list_entry(ptr, type, member) \ container_of(ptr, type, member)2.4. list_first_entry#define list_first_entry(ptr, type, member) \ list_entry((ptr)->next, type, member)2.5. list_last_entry#define list_last_entry(ptr, type, member) \ list_entry((ptr)->prev, type, member)2.6. list_first_entry_or_null#define list_first_entry_or_null(ptr, type, member) ({ \ struct list_head *head__ = (ptr); \ struct list_head *pos__ = READ_ONCE(head__->next); \ pos__ != head__ ? list_entry(pos__, type, member) : NULL; \ })2.7. list_next_entry#define list_next_entry(pos, member) \ list_entry((pos)->member.next, typeof(*(pos)), member)2.8. list_prev_entry#define list_prev_entry(pos, member) \ list_entry((pos)->member.prev, typeof(*(pos)), member)2.9. list_for_each#define list_for_each(pos, head) \ for (pos = (head)->next; pos != (head); pos = pos->next)2.10. list_for_each_prev#define list_for_each_prev(pos, head) \ for (pos = (head)->prev; pos != (head); pos = pos->prev)2.11. list_for_each_safe#define list_for_each_safe(pos, n, head) \ for (pos = (head)->next, n = pos->next; pos != (head); \ pos = n, n = pos->next)2.12. list_for_each_prev_safe#define list_for_each_prev_safe(pos, n, head) \ for (pos = (head)->prev, n = pos->prev; \ pos != (head); \ pos = n, n = pos->prev)2.13. list_for_each_entry#define list_for_each_entry(pos, head, member) \ for (pos = list_first_entry(head, typeof(*pos), member); \ &pos->member != (head); \ pos = list_next_entry(pos, member))2.14. list_for_each_entry_reverse#define list_for_each_entry_reverse(pos, head, member) \ for (pos = list_last_entry(head, typeof(*pos), member); \ &pos->member != (head); \ pos = list_prev_entry(pos, member))2.15. list_prepare_entry#define list_prepare_entry(pos, head, member) \ ((pos) ? : list_entry(head, typeof(*pos), member))2.16. list_for_each_entry_continue#define list_for_each_entry_continue(pos, head, member) \ for (pos = list_next_entry(pos, member); \ &pos->member != (head); \ pos = list_next_entry(pos, member))2.17. list_for_each_entry_from_reverse#define list_for_each_entry_from_reverse(pos, head, member) \ for (; &pos->member != (head); \ pos = list_prev_entry(pos, member))2.18. list_for_each_entry_safe#define list_for_each_entry_safe(pos, n, head, member) \ for (pos = list_first_entry(head, typeof(*pos), member), \ n = list_next_entry(pos, member); \ &pos->member != (head); \ pos = n, n = list_next_entry(n, member))2.19. list_for_each_entry_safe_continue#define list_for_each_entry_safe_continue(pos, n, head, member) \ for (pos = list_next_entry(pos, member), \ n = list_next_entry(pos, member); \ &pos->member != (head); \ pos = n, n = list_next_entry(n, member))2.20. list_for_each_entry_safe_from#define list_for_each_entry_safe_from(pos, n, head, member) \ for (n = list_next_entry(pos, member); \ &pos->member != (head); \ pos = n, n = list_next_entry(n, member))2.21. list_for_each_entry_safe_reverse#define list_for_each_entry_safe_reverse(pos, n, head, member) \ for (pos = list_last_entry(head, typeof(*pos), member), \ n = list_prev_entry(pos, member); \ &pos->member != (head); \ pos = n, n = list_prev_entry(n, member))2.22. list_safe_reset_next#define list_safe_reset_next(pos, n, member) \ n = list_next_entry(pos, member)