搜索到
383
篇与
的结果
-

-
Git常用命令助记 1. git的全局配置文件#查看当前的配置信息: $git config --list #编辑配置文件: $git config -e [--global] #配置提交代码时的账户信息: $git config [--global] user.name "[name]" $git config [--global] user.email "[email address]"2. 增加/删除文件#添加指定文件到暂存区 $git add [file1] [file2] ... #添加指定目录到暂存区,包括子目录 $git add [dir] #添加当前目录的所有文件到暂存区 $git add . #添加每个变化前,都会要求确认# 对于同一个文件的多处变化,可以实现分次提交 $git add -p #删除工作区文件,并且将这次删除放入暂存区 $git rm [file1] [file2] ... #停止追踪指定文件,但该文件会保留在工作区 $git rm --cached [file] #改名文件,并且将这个改名放入暂存区 $git mv [file-original] [file-renamed]3. 代码提交#提交暂存区到仓库区 $git commit -m [message] #提交暂存区的指定文件到仓库区 $git commit [file1] [file2] ... -m [message] #提交工作区自上次commit之后的变化,直接到仓库区 $git commit -a #提交时显示所有diff信息 $git commit -v #使用一次新的commit,替代上一次提交 $git commit --amend -m [message] #重做上一次commit,并包括指定文件的新变化 $git commit --amend [file1] [file2] ...4. 分支操作#列出所有本地分支 $git branch #列出所有远程分支 $git branch -r #列出所有本地分支和远程分支 $git branch -a #新建一个分支,但依然停留在当前分支 $git branch [branch-name] #新建一个分支,并切换到该分支 $git checkout -b [branch] #新建一个分支,指向指定commit $git branch [branch] [commit] #新建一个分支,与指定的远程分支建立追踪关系 $git branch --track [branch] [remote-branch] #切换到指定分支,并更新工作区 $git checkout [branch-name] #切换到上一个分支 $git checkout - #建立追踪关系,在现有分支与指定的远程分支之间 $git branch --set-upstream [branch] [remote-branch] #合并指定分支到当前分支 $git merge [branch] #选择一个commit,合并进当前分支 $git cherry-pick [commit] #删除分支 $git branch -d [branch-name]5. 查看提交变更#显示有变更的文件 $git status #显示当前分支的版本历史 $git log #显示commit历史,以及每次commit发生变更的文件 $git log --stat #显示指定文件相关的每一次diff $git log -p [file] #显示过去5次提交 $git log -5 --pretty --oneline #显示指定文件是什么人在什么时间修改过 $git blame [file] #显示暂存区和工作区的差异 $git diff #显示暂存区和上一个commit的差异 $git diff --cached [file] #显示某次提交的元数据和内容变化 $git show [commit] #显示某次提交发生变化的文件 $git show --name-only [commit]
-
git常用操作 使用git pull强制覆盖开发时,对于本地的项目中修改不做保存操作(或代码改崩),可以用到Git pull的强制覆盖,具体代码如下:git fetch --all && git reset --hard origin/master && git pull或git fetch --all // 下载远程仓库最新内容,不做合并git reset --hard origin/master // git reset指令把HEAD指向master最新版本,本地代码同步线上最新版本(会覆盖本地所有与远程仓库上同名的文件)git pull //可以省略git 撤销更改未使用 git add 缓存代码时可以使用 git checkout -- filepathname (比如: git checkout -- readme.md ,不要忘记中间的 “--” ,不写就成了检出分支了!!)。放弃所有的文件修改可以使用 git checkout . 命令。此命令用来放弃掉所有还没有加入到缓存区(就是 git add 命令)的修改:内容修改与整个文件删除。但是此命令不会删除掉刚新建的文件。因为刚新建的文件还没已有加入到 git 的管理系统中。所以对于git是未知的。自己手动删除就好了。已经使用了 git add 缓存了代码可以使用 git reset HEAD filepathname (比如: git reset HEAD readme.md)来放弃指定文件的缓存,放弃所以的缓存可以使用 git reset HEAD . 命令。此命令用来清除 git 对于文件修改的缓存。相当于撤销 git add 命令所在的工作。在使用本命令后,本地的修改并不会消失,而是回到了如(一)所示的状态。继续用(一)中的操作,就可以放弃本地的修改。已经用 git commit 提交了代码可以使用 git reset --hard HEAD^ 来回退到上一次commit的状态。此命令可以用来回退到任意版本:git reset --hard commitidgit log 可以查看请交历史记录git reset --soft commitID //只删除commitID之后的提交记录log,代码的改动还在。git reset --hard commitID //彻底删除commitID之后所做的改动,代码也一起回退回来了。 (慎重用,用前最好备份一下代码,或者用git diff 生成一个patch)
-
-
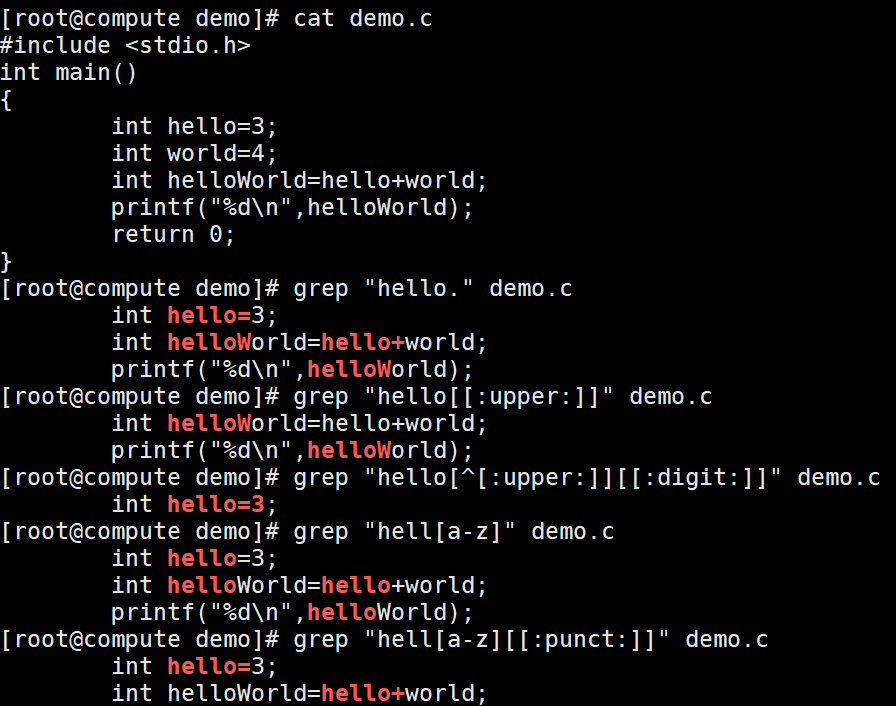
Linux grep命令 Linux grep命令简介Linux grep 命令用于查找文件里符合条件的字符串。grep 指令用于查找内容包含指定的范本样式的文件,如果发现某文件的内容符合所指定的范本样式,预设 grep 指令会把含有范本样式的那一列显示出来。若不指定任何文件名称,或是所给予的文件名为 -,则 grep 指令会从标准输入设备读取数据。grep家族总共有三个:grep,egrep,fgrep。语法grep [选项] "模式" [文件] grep [-abcEFGhHilLnqrsvVwxy][-A<显示行数>][-B<显示行数>][-C<显示行数>][-d<进行动作>][-e<范本样式>][-f<范本文件>][--help][范本样式][文件或目录...] 参数-a 或 --text : 不要忽略二进制的数据。-A<显示行数> 或 --after-context=<显示行数> : 除了显示符合范本样式的那一列之外,并显示该行之后的内容。-b 或 --byte-offset : 在显示符合样式的那一行之前,标示出该行第一个字符的编号。-B<显示行数> 或 --before-context=<显示行数> : 除了显示符合样式的那一行之外,并显示该行之前的内容。-c 或 --count : 计算符合样式的列数。-C<显示行数> 或 --context=<显示行数>或-<显示行数> : 除了显示符合样式的那一行之外,并显示该行之前后的内容。-d <动作> 或 --directories=<动作> : 当指定要查找的是目录而非文件时,必须使用这项参数,否则grep指令将回报信息并停止动作。-e<范本样式> 或 --regexp=<范本样式> : 指定字符串做为查找文件内容的样式。-E 或 --extended-regexp : 将样式为延伸的正则表达式来使用。-f<规则文件> 或 --file=<规则文件> : 指定规则文件,其内容含有一个或多个规则样式,让grep查找符合规则条件的文件内容,格式为每行一个规则样式。-F 或 --fixed-regexp : 将样式视为固定字符串的列表。-G 或 --basic-regexp : 将样式视为普通的表示法来使用。-h 或 --no-filename : 在显示符合样式的那一行之前,不标示该行所属的文件名称。-H 或 --with-filename : 在显示符合样式的那一行之前,表示该行所属的文件名称。-i 或 --ignore-case : 忽略字符大小写的差别。-l 或 --file-with-matches : 列出文件内容符合指定的样式的文件名称。-L 或 --files-without-match : 列出文件内容不符合指定的样式的文件名称。-n 或 --line-number : 在显示符合样式的那一行之前,标示出该行的列数编号。-o 或 --only-matching : 只显示匹配PATTERN 部分。-q 或 --quiet或--silent : 不显示任何信息。-r 或 --recursive : 此参数的效果和指定"-d recurse"参数相同。-s 或 --no-messages : 不显示错误信息。-v 或 --invert-match : 显示不包含匹配文本的所有行。-V 或 --version : 显示版本信息。-w 或 --word-regexp : 只显示全字符合的列。比如找like,就不会匹配文本中的liker-x --line-regexp : 只显示全列符合的列。-y : 此参数的效果和指定"-i"参数相同。模式部分直接输入要匹配的字符串,这个可以用fgrep(fast grep)代替来提高查找速度,比如我要匹配一下hello.c文件中printf的个数:fgrep -c "printf" hello.c使用基本正则表达式,下面谈关于基本正则表达式的使用:匹配字符: . :任意一个字符。[abc] :表示匹配一个字符,这个字符必须是abc中的一个。[a-zA-Z] :表示匹配一个字符,这个字符必须是a-z或A-Z这52个字母中的一个。1 :匹配一个字符,这个字符是除了1、2、3以外的所有字符。对于一些常用的字符集,系统做了定义:[A-Za-z] 等价于 [[:alpha:]][0-9] 等价于 [[:digit:]][A-Za-z0-9] 等价于 [[:alnum:]]tab,space 等空白字符 [[:space:]][A-Z] 等价于 [[:upper:]][a-z] 等价于 [[:lower:]]标点符号 [[:punct:]]匹配次数:{m,n} :匹配其前面出现的字符至少m次,至多n次。? :匹配其前面出现的内容0次或1次,等价于{0,1}。:匹配其前面出现的内容任意次,等价于{0,},所以 ".*" 表述任意字符任意次,即无论什么内容全部匹配。位置锚定:^ :锚定行首$ :锚定行尾。技巧" ^$ "用于匹配空白行。\b或\<:锚定单词的词首。如"\blike"不会匹配alike,但是会匹配liker\b或\>:锚定单词的词尾。如"\blike\b"不会匹配alike和liker,只会匹配like\B :与\b作用相反。分组及引用:(string) :将string作为一个整体方便后面引用\1 :引用第1个左括号及其对应的右括号所匹配的内容。\2 :引用第2个左括号及其对应的右括号所匹配的内容。\n :引用第n个左括号及其对应的右括号所匹配的内容。扩展的(Extend)正则表达式注意:使用扩展的正则表达式要加-E选项,或者世界使用egrep匹配字符: 与基本正则表达式一样匹配次数::和基本正则表达式一样? :基本正则表达式是?,这里没有\。{m,n} :相比基本正则表达式也是没有了\。:匹配其前面的字符至少一次,相当于{1,}。位置锚定:和基本正则表达式一样。分组及引用:(string) :相比基本正则表达式也是没有了\。\1 :引用部分和基本正则表达式一样。\n :引用部分和基本正则表达式一样。或者:a|b :匹配a或b,注意a是指 | 的左边的整体,b也同理。比如 C|cat 表示的是 C或cat,而不是Cat或cat,如果要表示Cat或cat,则应该写为 (C|c)at 。记住(string)除了用于引用还用于分组。注1:默认情况下,正则表达式的匹配工作在贪婪模式下,也就是说它会尽可能长地去匹配,比如某一行有字符串 abacb,如果搜索内容为 "a.*b" 那么会直接匹配 abacb这个串,而不会只匹配ab或acb。注2:所有的正则字符,如 [ 、* 、( 等,若要搜索 ,而不是想把 解释为重复先前字符任意次,可以使用 * 来转义。参考:Linux grep命令-菜鸟教程linux中grep命令的用法123 ↩
-
Android Service Framework、Binder Driver相关术语 相关术语:服务管理器(Service Server):指运行系统服务的进程,如System Server, Media Server服务客户端(Server Client):指使用系统服务的进程上下文管理器(Context Manager):是一个管理系统服务的系统进程,它管理安装在系统中的各种系统服务的位置信息Handle, 这些Handle用来指定Binder IPC的目的地址。服务框架(Service Framework):包含前面提到的Service Manager,其中定义了一系列类,用于服务使用者与系统服务间的RPC操作。服务接口(Service Interface):它是一个预先定义的接口,用在服务使用者与系统服务间。系统服务应该根据相关接口实现Stub函数,并提供相关服务。而服务使用者也必须根据相关接口调用服务。服务使用者:在服务客户进程中实际使用服务的模块。服务(Service):由服务Stub函数实现定义在服务接口中的功能,是提供实际服务功能的模块。服务代理(Service Proxy):执行RPC时用来对数据进行Marshalling处理的对象,不同的服务接口对应不同的服务代理。它提供服务代码函数,根据服务接口中定义的函数,对数据分别进行不同的Marshalling处理。服务Stub:RPC执行时用来对数据进行UnMarshalling处理的对象,该对象随接口不同而不同。它对接收到的数据进行UnMarshalling处理后,调用相关的服务Stub函数Binder Driver:Binder是Android中为支持IPC而采用的机制,它以Android Linux内核的Device Driver形态存在。Binder IPC:它是Android中进程间通过Binder Driver交换数据的方式。Binder IPC数据:一种用在Service Framework与Binder Driver间的数据格式。Binder RPC:服务会向使用者提供基于特定服务接口的函数,服务使用者通过Binder IPC调用这些函数,就像调用自身函数一样。Binder IPC内部是基于Binder IPC机制的。Binder RPC数据:服务使用者与服务间进行Binder IPC时的数据。
-
thermal代码分析(2)thermal_core.c thermal\_core是thermal框架的核心,负责将thermal\_zone、thermal\_cooling和thermal\_governor连接起来首先看下头文件thermal_core.h,/* Initial state of a cooling device during binding */ #define THERMAL_NO_TARGET -1UL /* * This structure is used to describe the behavior of * a certain cooling device on a certain trip point * in a certain thermal zone */ // thermal_instance结构体定义 struct thermal_instance{ ...... }; // 注册和卸载governor int thermal_register_governor(struct thermal_governor *); void thermal_unregister_governor(struct thermal_governor *); // 下面通过宏判断使用哪个governor #ifdef CONFIG_THERMAL_GOV_STEP_WISE int thermal_gov_step_wise_register(void); void thermal_gov_step_wise_unregister(void); #else static inline int thermal_gov_step_wise_register(void) { return 0; } static inline void thermal_gov_step_wise_unregister(void) {} #endif /* CONFIG_THERMAL_GOV_STEP_WISE */ ... ... /* device tree support */ #ifdef CONFIG_THERMAL_OF int of_parse_thermal_zones(void); void of_thermal_destroy_zones(void); int of_thermal_get_ntrips(struct thermal_zone_device *); bool of_thermal_is_trip_valid(struct thermal_zone_device *, int); const struct thermal_trip * of_thermal_get_trip_points(struct thermal_zone_device *); #else static inline int of_parse_thermal_zones(void) { return 0; } static inline void of_thermal_destroy_zones(void) { } static inline int of_thermal_get_ntrips(struct thermal_zone_device *tz) { return 0; } static inline bool of_thermal_is_trip_valid(struct thermal_zone_device *tz, int trip) { return false; } static inline const struct thermal_trip * of_thermal_get_trip_points(struct thermal_zone_device *tz) { return NULL; } #endif #endif /* __THERMAL_CORE_H__ */在thermal_core.c除了以上函数的具体实现,还包括一些其它函数,首先看一下thermal的初始化函数thermal\_init()函数:static int __init thermal_init(void) { int result; result = thermal_register_governors(); // 注册governor if (result) goto error; result = class_register(&thermal_class); // 注册/sys/class/thermal if (result) goto unregister_governors; result = genetlink_init(); // generic netlink初始化,干嘛的? if (result) goto unregister_class; result = of_parse_thermal_zones(); // 解析dts文件中的“thermal-zone”节点,并注册thermal_zone_device if (result) goto exit_netlink; result = register_pm_notifier(&thermal_pm_nb); // 注册notifier if (result) pr_warn("Thermal: Can not register suspend notifier, return %d\n", result); return 0; exit_netlink: genetlink_exit(); unregister_class: class_unregister(&thermal_class); unregister_governors: thermal_unregister_governors(); error: idr_destroy(&thermal_tz_idr); idr_destroy(&thermal_cdev_idr); mutex_destroy(&thermal_idr_lock); mutex_destroy(&thermal_list_lock); mutex_destroy(&thermal_governor_lock); return result; }接下来,看一下of_parse_thermal_zones函数,我们从设备树文件中找个thermal-zones节点,如下所示thermal-zones { soc_thermal { polling-delay = <1000>; polling-delay-passive = <100>; sustainable-power = <2150>; thermal-sensors = <&aml_sensor0 3>; trips { switch_on: trip-point@0 { temperature = <70000>; hysteresis = <1000>; type = "passive"; }; control: trip-point@1 { temperature = <80000>; hysteresis = <1000>; type = "passive"; }; hot: trip-point@2 { temperature = <85000>; hysteresis = <5000>; type = "hot"; }; critical: trip-point@3 { temperature = <260000>; hysteresis = <1000>; type = "critical"; }; }; cooling-maps { cpufreq_cooling_map { trip = <&control>; cooling-device = <&cpus 0 4>; contribution = <1024>; }; cpucore_cooling_map { trip = <&control>; cooling-device = <&cpu_cluster0 0 3>; contribution = <1024>; }; gpufreq_cooling_map { trip = <&control>; cooling-device = <&gpu 0 4>; contribution = <1024>; }; gpucore_cooling_map { trip = <&control>; cooling-device = <&gpucore 0 2>; contribution = <1024>; }; }; }; }; }; /* end of / */ 再看一下of\_parse\_thermal\_zones函数的具体实现,/** * of_parse_thermal_zones - parse device tree thermal data * * Initialization function that can be called by machine initialization * code to parse thermal data and populate the thermal framework * with hardware thermal zones info. This function only parses thermal zones. * Cooling devices and sensor devices nodes are supposed to be parsed * by their respective drivers. * * Return: 0 on success, proper error code otherwise * */ int __init of_parse_thermal_zones(void) { struct device_node *np, *child; struct __thermal_zone *tz; struct thermal_zone_device_ops *ops; np = of_find_node_by_name(NULL, "thermal-zones"); if (!np) { pr_debug("unable to find thermal zones\n"); return 0; /* Run successfully on systems without thermal DT */ } for_each_available_child_of_node(np, child) { struct thermal_zone_device *zone; struct thermal_zone_params *tzp; #ifdef CONFIG_AMLOGIC_TEMP_SENSOR const char *str; #endif int i, mask = 0; u32 prop; tz = thermal_of_build_thermal_zone(child); if (IS_ERR(tz)) { pr_err("failed to build thermal zone %s: %ld\n", child->name, PTR_ERR(tz)); continue; } ops = kmemdup(&of_thermal_ops, sizeof(*ops), GFP_KERNEL); if (!ops) goto exit_free; tzp = kzalloc(sizeof(*tzp), GFP_KERNEL); if (!tzp) { kfree(ops); goto exit_free; } /* No hwmon because there might be hwmon drivers registering */ tzp->no_hwmon = true; if (!of_property_read_u32(child, "sustainable-power", &prop)) tzp->sustainable_power = prop; #ifdef CONFIG_AMLOGIC_TEMP_SENSOR if (!of_property_read_string(child, "policy", &str)) strncpy(tzp->governor_name, str, THERMAL_NAME_LENGTH); #endif for (i = 0; i < tz->ntrips; i++) mask |= 1 << i; /* these two are left for temperature drivers to use */ tzp->slope = tz->slope; tzp->offset = tz->offset; // 注册thermal_zone_device zone = thermal_zone_device_register(child->name, tz->ntrips, mask, tz, ops, tzp, tz->passive_delay, tz->polling_delay); if (IS_ERR(zone)) { pr_err("Failed to build %s zone %ld\n", child->name, PTR_ERR(zone)); kfree(tzp); kfree(ops); of_thermal_free_zone(tz); /* attempting to build remaining zones still */ } } of_node_put(np); return 0; exit_free: of_node_put(child); of_node_put(np); of_thermal_free_zone(tz); /* no memory available, so free what we have built */ of_thermal_destroy_zones(); return -ENOMEM; } 在解析设备树函数中,将会调用thermal\_zone\_device设备注册函数,
-
thermal代码分析(1)Makefile文件 # # Makefile for sensor chip drivers. # obj-$(CONFIG_THERMAL) += thermal_sys.o thermal_sys-y += thermal_core.o #核心代码 # interface to/from other layers providing sensors thermal_sys-$(CONFIG_THERMAL_HWMON) += thermal_hwmon.o thermal_sys-$(CONFIG_THERMAL_OF) += of-thermal.o #dts解析 # governors 五种governor thermal_sys-$(CONFIG_THERMAL_GOV_FAIR_SHARE) += fair_share.o thermal_sys-$(CONFIG_THERMAL_GOV_BANG_BANG) += gov_bang_bang.o thermal_sys-$(CONFIG_THERMAL_GOV_STEP_WISE) += step_wise.o thermal_sys-$(CONFIG_THERMAL_GOV_USER_SPACE) += user_space.o thermal_sys-$(CONFIG_THERMAL_GOV_POWER_ALLOCATOR) += power_allocator.o # cpufreq cooling thermal_sys-$(CONFIG_CPU_THERMAL) += cpu_cooling.o # clock cooling thermal_sys-$(CONFIG_CLOCK_THERMAL) += clock_cooling.o # devfreq cooling thermal_sys-$(CONFIG_DEVFREQ_THERMAL) += devfreq_cooling.o # platform thermal drivers 平台相关代码,提供读取温度的接口 obj-$(CONFIG_QCOM_SPMI_TEMP_ALARM) += qcom-spmi-temp-alarm.o obj-$(CONFIG_SPEAR_THERMAL) += spear_thermal.o obj-$(CONFIG_ROCKCHIP_THERMAL) += rockchip_thermal.o obj-$(CONFIG_RCAR_THERMAL) += rcar_thermal.o obj-$(CONFIG_KIRKWOOD_THERMAL) += kirkwood_thermal.o obj-y += samsung/ obj-$(CONFIG_DOVE_THERMAL) += dove_thermal.o obj-$(CONFIG_DB8500_THERMAL) += db8500_thermal.o obj-$(CONFIG_ARMADA_THERMAL) += armada_thermal.o obj-$(CONFIG_TANGO_THERMAL) += tango_thermal.o obj-$(CONFIG_IMX_THERMAL) += imx_thermal.o obj-$(CONFIG_MAX77620_THERMAL) += max77620_thermal.o obj-$(CONFIG_QORIQ_THERMAL) += qoriq_thermal.o obj-$(CONFIG_DB8500_CPUFREQ_COOLING) += db8500_cpufreq_cooling.o obj-$(CONFIG_INTEL_POWERCLAMP) += intel_powerclamp.o obj-$(CONFIG_X86_PKG_TEMP_THERMAL) += x86_pkg_temp_thermal.o obj-$(CONFIG_INTEL_SOC_DTS_IOSF_CORE) += intel_soc_dts_iosf.o obj-$(CONFIG_INTEL_SOC_DTS_THERMAL) += intel_soc_dts_thermal.o obj-$(CONFIG_INTEL_QUARK_DTS_THERMAL) += intel_quark_dts_thermal.o obj-$(CONFIG_TI_SOC_THERMAL) += ti-soc-thermal/ obj-$(CONFIG_INT340X_THERMAL) += int340x_thermal/ obj-$(CONFIG_INTEL_BXT_PMIC_THERMAL) += intel_bxt_pmic_thermal.o obj-$(CONFIG_INTEL_PCH_THERMAL) += intel_pch_thermal.o obj-$(CONFIG_ST_THERMAL) += st/ obj-$(CONFIG_QCOM_TSENS) += qcom/ obj-$(CONFIG_TEGRA_SOCTHERM) += tegra/ obj-$(CONFIG_HISI_THERMAL) += hisi_thermal.o obj-$(CONFIG_MTK_THERMAL) += mtk_thermal.o obj-$(CONFIG_GENERIC_ADC_THERMAL) += thermal-generic-adc.o
-
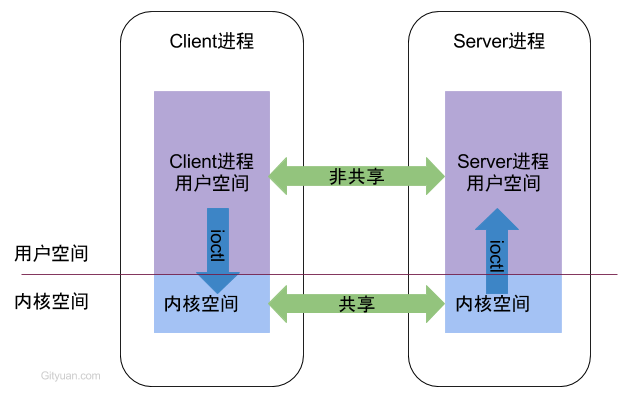
Android Binder机制(1)简介 [TOC]1. 概述Android系统中,每个应用程序是由Android的Activity,Service,Broadcast,ContentProvider这四剑客的中一个或多个组合而成,这四剑客所涉及的多进程间的通信底层都是依赖于Binder IPC机制。例如当进程A中的Activity要向进程B中的Service通信,这便需要依赖于Binder IPC。不仅于此,整个Android系统架构中,大量采用了Binder机制作为IPC(进程间通信)方案,当然也存在部分其他的IPC方式,比如Zygote通信便是采用socket。Binder作为Android系统提供的一种IPC机制,无论从事系统开发还是应用开发,都应该有所了解,这是Android系统中最重要的组成,也是最难理解的一块知识点,错综复杂。要深入了解Binder机制,最好的方法便是阅读源码,借用Linux鼻祖Linus Torvalds曾说过的一句话:Read The Fucking Source Code。2. Binder2.1 IPC原理从进程角度来看IPC机制每个Android的进程,只能运行在自己进程所拥有的虚拟地址空间。对应一个4GB的虚拟地址空间,其中3GB是用户空间,1GB是内核空间,当然内核空间的大小是可以通过参数配置调整的。对于用户空间,不同进程之间彼此是不能共享的,而内核空间却是可共享的。Client进程向Server进程通信,恰恰是利用进程间可共享的内核内存空间来完成底层通信工作的,Client端与Server端进程往往采用ioctl等方法跟内核空间的驱动进行交互。2.2 Binder原理Binder通信采用C/S架构,从组件视角来说,包含Client、Server、ServiceManager以及Binder驱动,其中Service Manager用于管理系统中的各种服务。架构图如下所示:可以看出无论是注册服务和获取服务的过程都需要ServiceManager,需要注意的是此处的Service Manager是指Native层的ServiceManager(C++),并非指framework层的ServiceManager(Java)。ServiceManager是整个Binder通信机制的大管家,是Android进程间通信机制Binder的守护进程,要掌握Binder机制,首先需要了解系统是如何首次启动Service Manager。当Service Manager启动之后,Client端和Server端通信时都需要先获取Service Manager接口,才能开始通信服务。图中Client/Server/ServiceManage之间的相互通信都是基于Binder机制。既然基于Binder机制通信,那么同样也是C/S架构,则图中的3大步骤都有相应的Client端与Server端。注册服务(addService):Server进程要先注册Service到ServiceManager。该过程:Server是客户端,ServiceManager是服务端。获取服务(getService):Client进程使用某个Service前,须先向ServiceManager中获取相应的Service。该过程:Client是客户端,ServiceManager是服务端。使用服务:Client根据得到的Service信息建立与Service所在的Server进程通信的通路,然后就可以直接与Service交互。该过程:client是客户端,server是服务端。图中的Client,Server,Service Manager之间交互都是虚线表示,是由于它们彼此之间不是直接交互的,而是都通过与Binder驱动进行交互的,从而实现IPC通信方式。其中Binder驱动位于内核空间,Client,Server,Service Manager位于用户空间。Binder驱动和Service Manager可以看做是Android平台的基础架构,而Client和Server是Android的应用层,开发人员只需自定义实现client、Server端,借助Android的基本平台架构便可以直接进行IPC通信。2.3 C/S模式BpBinder(客户端)和BBinder(服务端)都是Android中Binder通信相关的代表,它们都从IBinder类中派生而来,关系图如下:client端:BpBinder.transact()来发送事务请求;server端:BBinder.onTransact()会接收到相应事务。转载:http://gityuan.com/2015/10/31/binder-prepare/
-
C库函数--memset()函数 描述在定义变量时一定要进行初始化,尤其是数组和结构体这种占用内存大的数据结构。在使用数组的时候经常因为没有初始化而产生“烫烫烫烫烫烫”这样的野值,俗称“乱码”。每种类型的变量都有各自的初始化方法,memset() 函数可以说是初始化内存的“万能函数”,通常为新申请的内存进行初始化工作。它是直接操作内存空间,mem即“内存”(memory)的意思。原型该函数的原型为:# include <string.h> void *memset(void *str, int c, size_t n);参数:str -- 指向要填充的内存块。c -- 要被设置的值。该值以 int 形式传递,但是函数在填充内存块时是使用该值的无符号字符形式。n -- 要被设置为该值的字符数。函数的功能是:将指针变量 s 所指向的前 n 字节的内存单元用一个“整数” c 替换,注意 c 是 int 型。str 是 void* 型的指针变量,所以它可以为任何类型的数据进行初始化。返回值:该值返回一个指向存储区 str 的指针。memset() 的作用是在一段内存块中填充某个给定的值。因为它只能填充一个值,所以该函数的初始化为原始初始化,无法将变量初始化为程序中需要的数据。用memset初始化完后,后面程序中再向该内存空间中存放需要的数据。memset 一般使用“0”初始化内存单元,而且通常是给数组或结构体进行初始化。一般的变量如 char、int、float、double 等类型的变量直接初始化即可,没有必要用 memset。如果用 memset 的话反而显得麻烦。当然,数组也可以直接进行初始化,但 memset 是对较大的数组或结构体进行清零初始化的最快方法,因为它是直接对内存进行操作的。这时有人会问:“字符串数组不是最好用'\0'进行初始化吗?那么可以用 memset 给字符串数组进行初始化吗?也就是说参数 c 可以赋值为'\0'吗?”可以的。虽然参数 c 要求是一个整数,但是整型和字符型是互通的。但是赋值为 '\0' 和 0 是等价的,因为字符 '\0' 在内存中就是 0。所以在 memset 中初始化为 0 也具有结束标志符 '\0' 的作用,所以通常我们就写“0”。memset 函数的第三个参数 n 的值一般用 sizeof() 获取,这样比较专业。注意,如果是对指针变量所指向的内存单元进行清零初始化,那么一定要先对这个指针变量进行初始化,即一定要先让它指向某个有效的地址。而且用memset给指针变量如p所指向的内存单元进行初始化时,n 千万别写成 sizeof(p),这是新手经常会犯的错误。因为 p 是指针变量,不管 p 指向什么类型的变量,sizeof(p) 的值都是 4。注意,C语言中的指针和数组名不完全等价,不能将它们混为一谈。下面写一个程序:# include <stdio.h> # include <string.h> int main(void) { int i; //循环变量 char str[10]; char *p = str; memset(str, 0, sizeof(str)); //只能写sizeof(str), 不能写sizeof(p) for (i=0; i<10; ++i) { printf("%d\x20", str[i]); } printf("\n"); return 0; }根据memset函数的不同,输出结果也不同,分为以下几种情况:memset(p, 0, sizeof(p)); //地址的大小都是4字节 0 0 0 0 -52 -52 -52 -52 -52 -52 memset(p, 0, sizeof(*p)); //*p表示的是一个字符变量, 只有一字节 0 -52 -52 -52 -52 -52 -52 -52 -52 -52 memset(p, 0, sizeof(str)); 0 0 0 0 0 0 0 0 0 0 memset(str, 0, sizeof(str)); 0 0 0 0 0 0 0 0 0 0 memset(p, 0, 10); //直接写10也行, 但不专业 0 0 0 0 0 0 0 0 0 0